Shaders Plus
Documentation
Learn how each setting and feature can be used to its fullest extent!
Developed by SMOUSE (Cody Setchfield)
Quick Navigation...
Documentation > Tutorials
Shaders Plus
Tutorials
Covering the fundamental basics of Shaders Plus, by SMOUSE
Free Masterclass tutorial by Gleb Alexandrov, of Creative Shrimp
Documentation > Installation
Shaders Plus
Installation
You can install the Shaders Plus Addon very simply!First, navigate to Preferences > Add-ons > Install.
Select the .zip file you downloaded for Shaders Plus (do not unzip after downloading), and make sure to enable the checkbox for Shaders Plus to enable it.
Finally, hit Save Preferences * to make sure Shaders Plus will stay installed after each restart.
* USING BLENDER 4.2? *
Preferences > Add-ons > [top right drop down arrow] > Install from Disk... > select the downloaded zip file > Enable Checkbox > Save Preferences.
You can use Shaders Plus by adding a new material, and choosing a desired preset from several convenient locations, as shown here...
Note: Shaders Plus v4 is compatible with all versions of Blender 3.6+, but was built with the new Blender 4.0 "Shader Labels" in mind, so the node group UI will not be as clean in versions earlier than 4.0.For the best intended experience, consider using Shaders Plus v3 in Blender 3.6, and Shaders Plus v4 in Blender 4.0+
Documentation > Caustics
Shaders Plus
"Caustics"
Guides on how to use the Real-Time Caustics features and controls within Shaders Plus.
Quick Tip: The color of the caustics are tied to the overall material color.
Extra Settings...
Documentation > Caustics > Strength
Caustics
"Caustics Strength"
Caustics Strength determines the overall intensity of the caustics.Make sure the Transmission is turned on in your shader controls if you're using Principled Plus or BSDF (with Modules).A value of 0.0 is "Off", while 1.0 is the "base" output, it's recommended to go beyond 1.0, to 3.0, or even 30.0 depending on how necessary the case may be. However, it's usually best to stick around 1.0 - 3.0.
Documentation > Caustics > Object Shadow
Caustics
"Caustics Object Shadow"
Caustics Object Shadow reintroduces the original shadow of the object, without getting rid of the center caustics entirely.Be mindful when pairing it with Caustics Dispersion, as it can increase the contrast of the colors, so be gentle with the values.
Under the + Settings menu, you'll find an Old Object Shadow button, which allows you to utilize the older v3 Object Shadow method.In comparison, this is basically an inverted version of the current method, simply allowing for more stylistic control.
Documentation > Caustics > Dispersion
Caustics
"Caustics Dispersion"
Caustics Dispersion adds and moderates the of chromatic dispersion where the caustic's hotspots are.Controlling the width spread is not currently possible with this setup yet (that would be cool), only the overlay and saturation intensity.The Dispersion is also linked to the Complex / Simple Caustics setting.
You can optionally sync the Caustics Dispersion with the + Dispersion control by enabling Link Disperions (+ Dispersion is Master) under + Settings, where the + Dispersion will now override the Caustics dispersion control. Allowing you to have consistent and equal control over both.
Documentation > Caustics > Focal Point
Caustics
"Focal Point"
Caustics Focal Point is a new feature in Shaders Plus v4.Focal Point allows you to reposition the central origin point of where the caustics are generated. This allows for more precise artistic control of how and where the caustics generated.Default value is 1.0, which is directly under the source mesh.
0.0 moves the caustics up the shadow, away from the source.
1.0 and above moves the shadow closer to the source object.
As seen in the demo video, you'll get further control when changing the Complex / Simple Caustics value.This setting also works great in tandem with Caustics IOR
Documentation > Caustics > Caustics IOR
Caustics
"IOR"
Caustics IOR (Index of Refraction) is a new feature in Shaders Plus v4.This value lets you adjust the refractive index, or to put simply, the shape of the caustics depending on their mesh output.This feature is especially useful for instances where you would like to adjust the shape of the hotspot result.
Say you have a sphere, and are not immediately getting a central hotspot like you would expect. Caustics IOR lets you adjust where that hotspot should be.
This is extremely important for art direction.
As seen in the demo video, you'll get further control when changing the Complex / Simple Caustics value.This setting also works great in tandem with Caustics Focal Point
Documentation > Caustics > Caustics Imperfections
Caustics
"Imperfections"
Caustics Imperfections acts as a sort of blur filter for the technique used to generate the caustics, especially the Dispersion, as well as for breaking up the shape a bit to introduce some visual noise.0.0 is no imperfections; hard banding.
1.0 is full "blur" effect.
Low values like 0.1 or less are great for stylized jaggy effects.
From this second video example, you can see how the imperfections also mimic the Light Size effect. Increasing the light size makes all shadows softer. Since the caustics are driven by shadow information, the dispersion bands get blurred.
The Imperfections slider is useful for being able to retain sharp shadows from a small light size, while still having that blurred caustics effect.
Documentation > Caustics > Complex / Simple Caustics
Caustics
"Complex / Simple"
Complex / Simple Caustics is a new feature in Shaders Plus v4.Complex vs Simple Caustics simply lets you change which "caustics engine" is being used.
Complex Caustics add more "hotspot arms" from the center-outwards, allowing for more detailed caustics.
Simple is a singular hotspot. This is extremely useful for more simple and/or intentional design choices.
As seen in the demo video, you'll get further control when changing the Complex / Simple Caustics value.This setting also works great in tandem with Caustics Focal Point
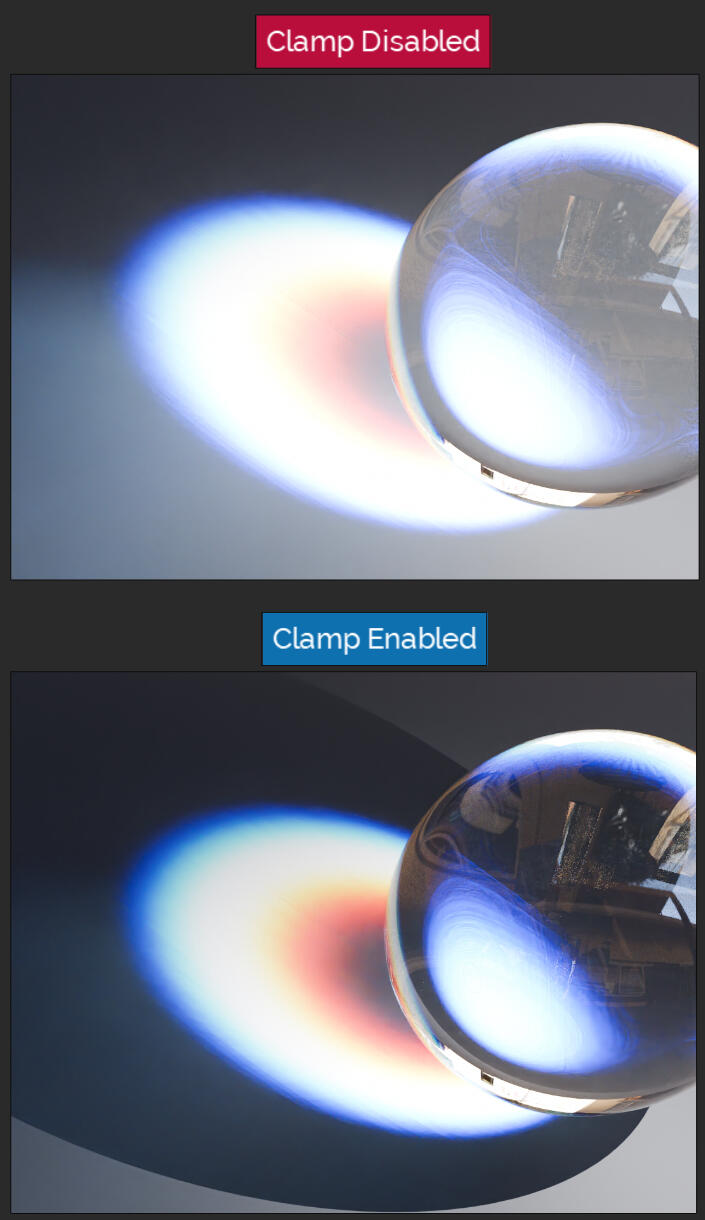
Documentation > Caustics > Energy Conservation
+ Settings
"Energy Conservation (Clamp)"
This is simply a toggle button that allows you to clamp the settings of the Caustics and various features, by not letting values from the Caustics Shadow for example exceed 1.0 (where the shadow becomes invisible).
Documentation > Dispersion
Shaders Plus
"Dispersion"
Learn how to utilize the realistic Dispersion effects within Shaders Plus, to create photorealistic glass, water, jewelry, and more!Fun Fact: Our Dispersion is "continuous", meaning it produces a realistic prism-gradient effect, rather than a simple RGB offset.
Documentation > Dispersion > Intensity
Dispersion
"Intensity"
Intensity simply controls the, well, intensity of the Dispersion effect.
The value can be manually increased beyond 1.0 for stylized/artistic control.
Note: Disperison is none to cause some energy loss in the brightness of the Principled Plus Shader. This is a side effect of how the new Principled 2.0 shader works in Blender 4.0+
Documentation > Dispersion > Falloff
Dispersion
"Falloff"
Dispersion Falloff is intended for limiting what parts of the mesh the dispersion is applied to. Based on fresnel falloffs, the dispersion can be nearly blank on most front facing surface, but will be more strongly applied to shallow angles.
This is great for getting realistic results for things with intricate or ornate details, instead of a uniform value across the entire mesh.
Documentation > Dispersion > Internal Reflection
Dispersion
"Internal Reflection"
Internal Dispersion Reflection is used to essentially change what the type of object is.
A value of 0.0 means the dispersion light will pass through the front face, cause a dispersion, and leave the back-face without any change.
A value of 1.0 means the light will change on the first face, and change again once more upon exiting the back face, effectively doubling the dispersion effect.
Documentation > Dispersion > Saturation
Dispersion
"Saturation"
Dispersion Saturation simply adjusts the saturation of the chromatic dispersion, without affecting the actual dispersion effect itself.
Documentation > Dispersion > Color Shift
Dispersion
"Color Shift"
Dispersion Color Shift simply cycles the color range of the chromatic shift, through the entire color sprectrum, from a value of -1.0, to 1.0. Default value is 0.0
Documentation > Thin Film
Shaders Plus
"Thin-Film Interference"
Learn the all the powerful ways to utilize our physically accurate Thin-Film Interference feature! It's perfect for use cases such as pearlescence, anodized metals, oil spills, soap bubbles, and so much more! Works with all shader functions, as well as EEVEE Compatible!
Fun Fact: With the help of Dr. Robert Mooreland's formula, we're able to achieve physically accurate Thin-Film without gradients, allowing for a long range of color transitions without any hard clamping due to color ramps.
Documentation > Thin Film > Intensity
Thin Film
"Intensity"
Thin Film Intensity determins the strength of the Thin Film application over your shader.
While Blender 4.2 comes with Thin-Film, Shaders Plus's Thin Film is able to be applied over all material types (metallic, diffuse, transmission), as well as being compatible with EEVEE.
Documentation > Thin Film > IOR
Thin Film
"IOR"
Thin Film IOR essentially cycles through the interference color-range, respective to it's "width".
Documentation > Thin Film > Width
Thin Film
"Width"
Thin Film Width controls the width-spread of each thin film color band. Plug in textures or procedural setups to assign some degree of static mapping.
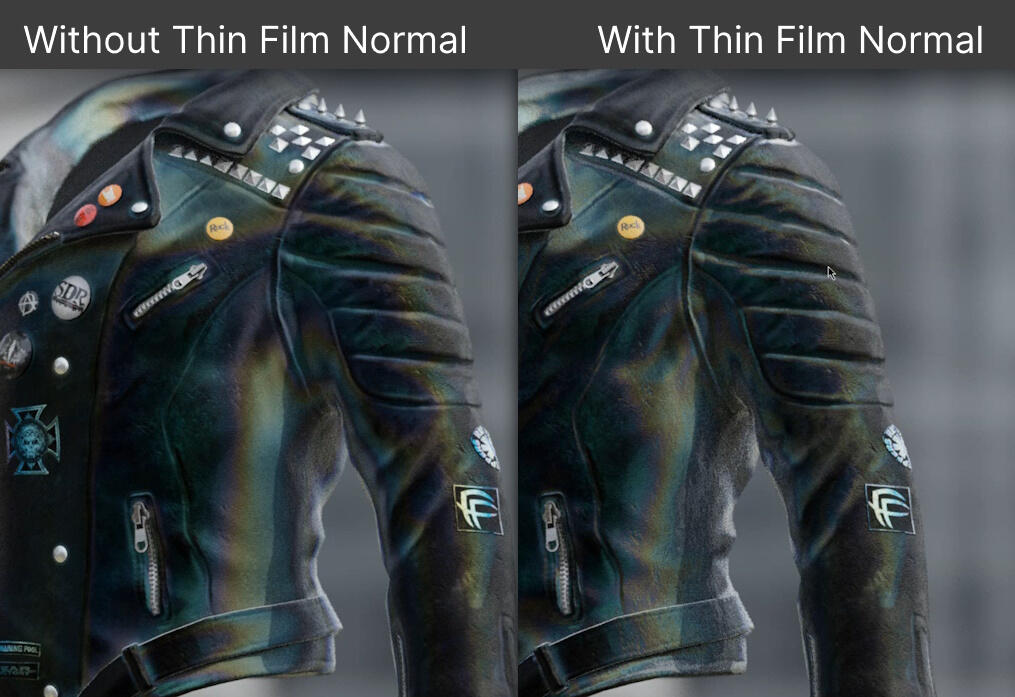
Documentation > Thin Film > Normal
Thin Film
"Normal"
Thin Film Normal lets you assign custom normal maps specifically to the Thin Film influence, rather than just the shader as a uniform influence.
Documentation > Modules
Shaders Plus
"Modules"
Modules allow you to utilize the Shaders Plus features in any existing shader set up, non-destructively! We achieve this by breaking down the shaders features into their own "modules", which can simply be injected into other node networks.
Documentation > Modules > Caustics Module
Modules
"Caustics Module"
Simply plug the Caustics Module AFTER the shader output of your main shader setup. Ie, plug your Principled BSDF or Glass BSDF into the Caustics Module, and plug the Caustics Module into the Material Ouput node.Additionally, plug any existing color nodes into the caustics color input as well.
Note: Video shown is from Shaders Plus v3, but content is still applicable.
Documentation > Modules > Dispersion Module
Modules
"Dispersion Module"
Simply plug the Dispersion Module into the existing color input, or simply the blank color input of your shader.Next, plug the IOR output from the Dispersion Module into your main Shader IOR input. This allows the Dispersion effect to work.
Documentation > Modules > Thin Film Module
Modules
"Thin Film Module"
Simply plug the Thin Film Module into the existing Color channel of your shader setup. Additionally, plug in the Thin Film Normal if available.
Documentation > Modules > Module Combiner
Modules
"Module Combiner"
Module Combiner is necessary for having full control over the modules. We have individual modules, but what if we want to use Thin-Film & Dispersion at the same time? That's where the Module Combiner comes in!Simply take your Dispersion and Thin Film Modules, and plug them into their respective slots in the Combiner inputs.
Don't forget to plug in the Dispersion IOR independently.Combing this with the Caustics Module at the of the Shader network, you can essentially rebuild the entire Shaders Plus functionality on your own!
Home > Bug Report
Shaders Plus
Bug Report
Please share with us any bugs, glitches, or any feedback you think we should know. :)
Developed by SMOUSE
If you are having a "Missing Manifest" error when trying to use Shaders Plus in Blender 4.3, please download the latest (4.3 Patch) in your download.
Does your issue happen to be listed below?
Problem not listed above?
If your problem is not one of these known issues, please feel free to fill out this form and let us know what you are encountering.
Please include as much information and details as possible, along with your correct email address in case we need to get in touch with you for more details about replicating this issue ourselves.Thank you, and we apologize for any inconveniences you may be encountering.